Setup AWS
Setting up a Kubernetes Cluster with AWS
Deploy a Kubernetes cluster in AWS using EKS service.
Requirements
- AWS account
- CLI and AWS credentials configured
- AWS IAM Authenticator
kubectl- wget (required for EKS module)
Warning
LINUX/MACI is preffered method of setup
Windows should choose either
- Deploy a HermesNode from a Linux VPS.
- Use Windows Subsystem for Linux - https://docs.microsoft.com/en-us/windows/wsl/about
Steps
Firstly, clone and enter the cluster-launcher repository (Currently This Repo Link is Private Not Accessible By Outside Origanization). All commands in this section are to be run inside this repo.
git clone https://github.com/dojimanetwork/validator-cluster-launcher
cd cluster-launcher
Then install the terraform CLI:
Install Terraform:
brew install terraform
AWS CLI
In order for Terraform to run operations on your behalf, you must install and configure the AWS CLI tool. ****To install the AWS CLI, follow these instructions, or choose a package manager based on your operating system
Use the package manager homebrew to install the AWS CLI.
```jsx
brew install awscli
aws configure
```
Warning
You will be asked for you Personal Access Token with read/write privileges (retrieve from API Panel from the GCP web console.) API -> Tokens/Keys -> Create Token. Make sure you handle your secrets securely!
AWS IAM Authenticator
You also must install and configure the AWS IAM Authenticator tool. To install, follow these instructions, or choose a package manager based on your operating system.
Use the package manager homebrew to install the AWS IAM Authenticator.
brew install aws-iam-authenticator
Kubernetes Control Tool
You must install and configure the Kubernetes CLI tool (kubectl). To install kubectl , follow these instructions, or choose a package manager based on your operating system.
Use the package manager homebrew to install the AWS IAM Authenticator.
Use the package manager homebrew to install kubectl.
brew install kubernetes-cli
wget && jq
You also need wget and jq, follow these instructions, or choose a package manager based on your operating system.
Use the package manager homebrew to install wget and jq Note: You most likely have these installed already.
brew install wget
brew install jq
Deploy Kubernetes Cluster
Use the commands below to deploy a DOKS cluster:
make aws
During the deploy, you will be asked to enter information about your cluster

- Name
- AWS Region – see valid List of Regions
- Confirm
yes
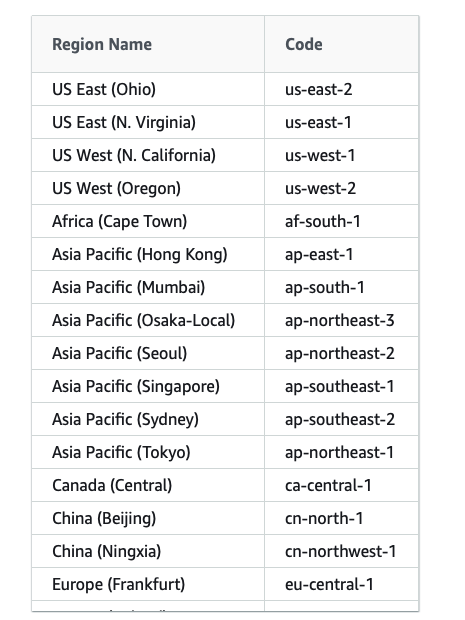
Regions
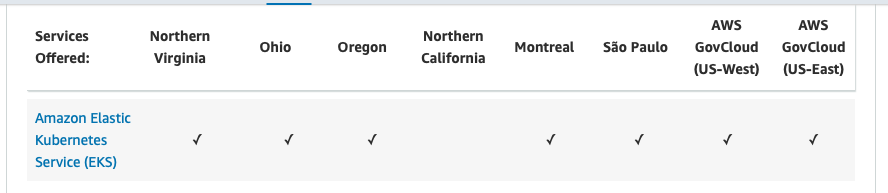
Note: AWS EKS is not available in some regions
or manually
cd aws/
terraform init
terraform plan # to see the plan
terraform apply
Final success message: Apply complete! Resources: 30 added, 0 changed, 0 destroyed.
Info
If you are a returning node operator and you wish to use the same node name, the Cloudwatch log files from your previous session will block this step. You need to manually delete the logs from your console: Cloudwatch / Cloudwatch Logs / Log Groups -> “delete”
Info
Deploying a cluster takes ~10 minutes
CONFIGURE kubectl
This is done automatically during provisioning. To configure authentication from the command line, use the following command. It will get the access credentials for your cluster and automatically configure kubectl in case you need to to manually reconfigure kubectl.
make kubeconfig-aws
Or get your kubeconfig file manually:
(cd aws && aws eks --region $(terraform output -raw region) update-kubeconfig --name $(terraform output -raw cluster_name))
To verify, run this, and check the status is “Ready”:
kubectl version
kubectl cluster-info
kubectl get nodes
You are now ready to deploy a HermeNode.
BACKUPS (OPTIONAL)
Once your node is running, use the following command to automatically backup the Persistent Volumes for your Kubernetes cluster. This may help in recovering your node in the event of a disaster.
Enable backups:
make aws-backups
Disable backups:
make aws-destroy-backups